
I was surprised how a small step can change the design completely and made another bracelet out of it.
~22cm (~8.7 in.) bracelet
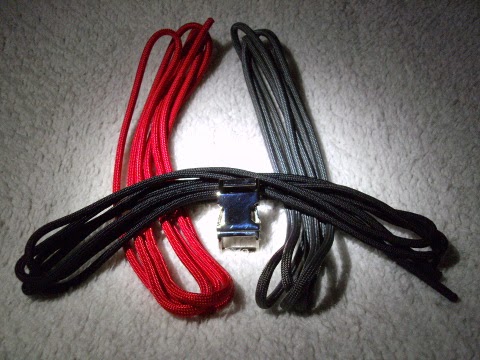
~190cm (~6.3 ft.) black
~150cm (~5 ft.) charcoal grey
~150cm (~5 ft.) red
To prevent the bracelet from shrinking, I recommend to put the cords in boiling hot water for a few minutes.

As shown in Knotorial 01, start with a buckle connected to three colors.
Make sure you use the correct cord length and arrange it as shown in the picture. The outer cords are the longest strands.

Turn the bracelet to the backside, then use the outer cords to form a cross laying over the other cords.
Always remember which cord you use first, i'll start with the right cord then laying the left cord over it.

Use the cords from the cross to form loops, first behind, then over the other cords on the left and right side, as shown in the picture.

Pull the ends of the outer cords through the upper cross.


Pull the ends of the remaining outer cords through the loops from the cross, forming Snake Knots.


Tighten the loops and knots firmly to get a result as shown in the picture.

Well done ! The technique to tie the Embraced Arrows is almost completed. The frontside should look like this.
The beginning is slightly different because I thought it looks better this way.

Step 07:
To continue the pattern, use the same color as in Step 02 to form the next cross and the loops.

Step 08:
From now on use the inner cords that form the red arrows and pull them through the upper cross.

Step 09:
Pull the ends of the outer cords through the lower loops, forming Snake Knots.

Step 10:
Tighten the loops and knots firmly.


Repeat Step 07 - Step 10 to continue the pattern until you reached the desired bracelet length.
Don't forget to calculate the buckle and the finish for the length.
Don't forget to calculate the buckle and the finish for the length.

To finish the bracelet turn it to the backside and pull the outer ends through their own loops.


Turn the bracelet to the frontside and use the remaining outer cords to form loops around the inner cords.
Start with the right side...


Turn the bracelet to the backside and pull the remaining cords through the frontside of the buckle.

Pull the middle cords through both loops formed in Step 12.

Pull the remaining ends each through one loop, as shown in the picture.

Tighten the loops and knots firmly.
Hold the buckle and pull on the ends.


Cut and singe the ends on the backside.


Frontview of the finished bracelet.

Feel free to post pictures of your results and feedback is also always welcome !
This tutorial is great as well as the outcome. I think it will be much easier for audience to follow the steps by watching a video tutorial than following the steps through pictures. I think it will be a good idea if you do so. I really like the bracelet you have created so I wanted to throw my suggestion out to you. :)
ReplyDeleteThank you very much Joseph !
DeleteWhen I started tying with paracord, there were many videos which I had to pause every few seconds to follow the steps. A few weeks later I purchased the 'Paracord Fusion Ties' book from J.D. Lenzen and decided to go with picture/text tutorials too, because they were so easy to follow for me. :)